Luminar 2018 Gets a “Rocket-Booster” Update
April 12, 2018

We are happy to bring you the latest update to Skylum Luminar. With the new updated Luminar Jupiter, users get photo editing at its finest.
Inside there’s over 300 improvements and updates to make Luminar more responsive and useful. We have made some significant performance enhancements that allow you to edit your photos much faster. In fact, some users report seeing speed gains of up to twelve times faster!
Of course, speed is only part of the news. We’ve dramatically improved our RAW Develop filter for even cleaner images with better color and less noise. We’ve also added several features to the Windows version of Luminar.
We truly want Luminar to be your hub for photo editing… a genuine alternative to Adobe Lightroom. We know that photographers need two things in order to make the switch. First is a high-quality raw converter to unlock the best image that’s rich in detail and color, while free from noise and artifacts. Second is speed– a responsive application that keeps up with you and makes it easy to edit photos to look their best.
We’re hard at work to become the best photo editor on the planet (and soon digital asset manager too). Let’s explore what’s new!
Get More Done in Less Time
We’ve dramatically increased the speed of editing across all areas of Luminar. Images open faster. Filters apply quicker. The entire application is more responsive. Our team dug into all the code to optimize and refine the application. This is the fastest Luminar ever… in fact, you should be able to see the difference with every tool and command. We want you to be able to work faster on your favorite images so you’ve got more time to take photos.
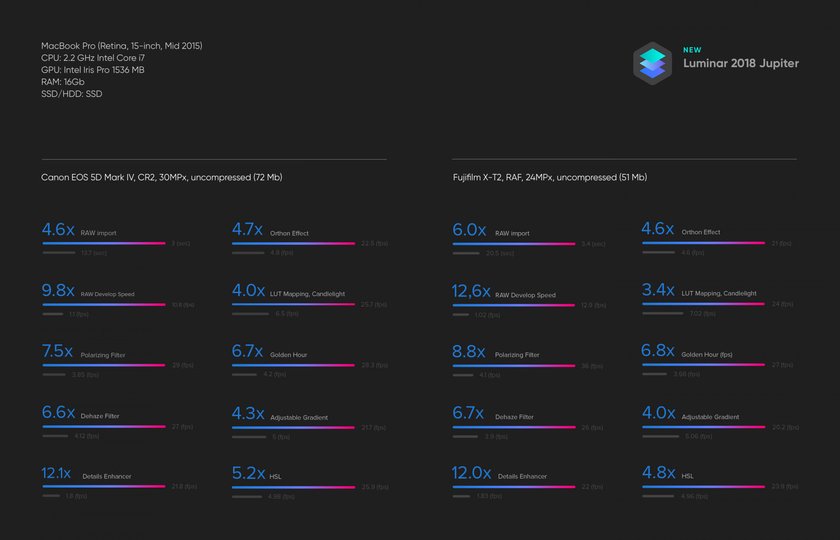
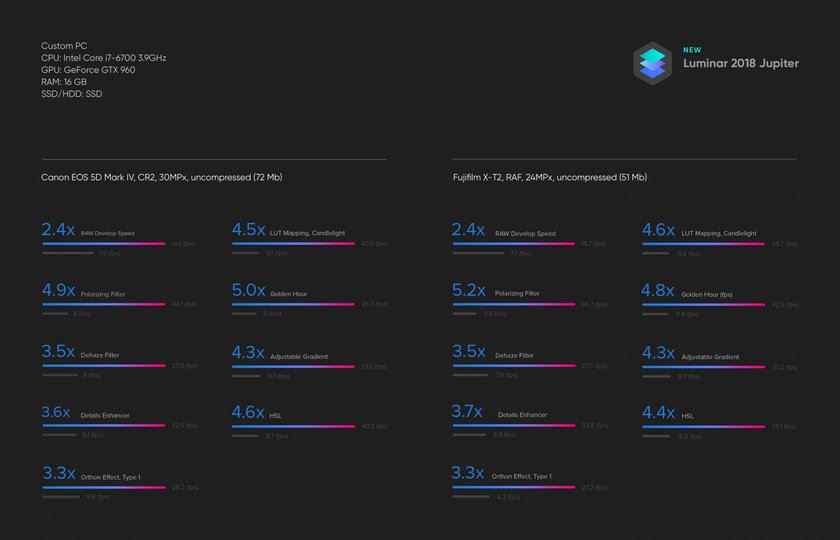
Most users will see snappier sliders, they’ve all seen performance boosts of 3-12X for easier adjustments.
Have plenty of RAM and a fast video card? Luminar better uses your system for faster performance with many operations seeing significant boosts.
We’ve also made numerous interface and user experience improvements based on your feedback for an improved editing experience. We’ve built-in several improvements to add stability as well as to improve performance when editing even the largest of images.
Speed improvements for Mac

Speed improvements for Windows
 Better RAW Conversion
We know that the key to every great image is how you handle the RAW file. That’s why we keep improving our RAW engine.
Better exposure calculation. We’ve refined the initial brightness setting for RAW files so it is a perfect match to how your camera saw the scene.
Cleaner gradients. We’ve improved the de-mosaic process for even cleaner image conversion. This means smooth transitions in areas like skies and shadows for accurate color and less noise.
Fewer halos. Have an image with high contrast areas? Be sure to use the improved Defringe option (under the Lens tab) to help with backlit areas or strong contrast.
More cameras, better compatibility. Now even more RAW formats can be edited natively with our RAW Develop filter. Plus we’ve refined a bunch of our existing camera modules for even better RAW conversion.
No more chromatic aberration. Does your lens show color artifacts in high contrast or backlit areas? Get rid of those green and cyan shifts with our even easier to use Auto Chromatic aberration removal option.
Remove lens distortion automatically
Getting the perfect shot is now easier than ever. Our RAW Develop filter analyzes your image and its metadata to calculate an Automatic Lens Distortion fix that you can apply in one-click. Get rid of wide angle distortion and get truer perspective lines and more attractive portraits. Simply apply the RAW Develop filter and then choose the Lens tab and check the box under Auto Corrections for Lens Distortion.
Advanced support for DCP Profiles
Are you looking for truly professional control over your raw files? Then give Digital Camera Profiles a try. Luminar recognizes the industry standard DCP files that you may already have on your computer (or have bought from third parties). This feature is currently available for Mac and will be available soon for Windows.
Essential New Features for Windows Users
We appreciate the patience our Windows users have shown as we’ve started developing cross-platform applications. Our team has put a ton of effort into making the Windows experience be world-class and significantly faster. In fact, we feel that the PC version now matches the Mac version for all core features and speed. We truly appreciate all the feedback from our Windows users and want them to have a world-class photo editor.
Here are some Windows-specific additions
NEW. Batch processing. Want to apply the same preset to a group of photos from the same shoot? The powerful Batch Processing workflow saves you time and effort. Just press Ctrl + B to setup a batch process with your favorite preset.
NEW. Easy transformations. You can easily transform the shape of an image with the Free Transform tool–scale and position an object as needed. Plus you can easily Flip an image and Rotate an image using the Image menu commands. Plus try out the useful shortcuts of Ctrl+ [ and Ctrl + ] for quick rotation.
Localization support. It’s even easier to use Luminar in a different language. We’ve improved the localizations for greater accuracy and have also added the ability to change localization language in the File menu.
Better cloning. You can quickly call up the Clone & Stamp module by pressing Ctrl + J. Be sure to also experiment by adjusting the softness, opacity, and size of the brush that can now be modified.
Cleaner zooms. We’ve accelerated zooming and serve up a cleaner image at all sizes. Images appear sharper when you zoom beyond 100% for detail work. Plus you’ll get a cleaner preview when you zoom out to see the whole image.
Preview mode. Want to check out your photo free from any distractions? Press the F key to invoke a Full-Screen Preview. This is a great way to really study an image in detail.
Better masking controls. Users can create masks more easily when painting masks. Just hold down the spacebar and drag with the cursor to pan and move around the image when masking. with faster masking tools.
Improved workflow with other applications. When using Luminar as a plugin with other applications, color profiles are properly included. This change also improves image exporting with attached profiles.
Share workspaces. Want to send one of your custom workspaces to another user? You can now choose File > “Show workspaces folder” to reveal your custom workspaces. You can also add other workspaces to that folder (like these great ones from portrait photographer Matthew Jordan Smith).
How to Update
The next time you launch Luminar, it should prompt you to update the software. You can also manually check for the update.
Mac – Please choose Luminar 2018 > Check for updates.
Windows – Please choose Help > Check for updates.
We hope you enjoy these improvements. We’re hard at work on more as well as the new digital asset manager for later this year.


