Best Astrophotos: A Visual Journey Through the Night Sky
Last Updated on October 15, 2025
Learn how to capture stunning night sky photos with depth and clarity. Master long exposure, star tracking, and framing for perfect astrophotography.
Great night images blend patience, planning, and taste. Long exposures tame faint light, careful tracking keeps stars tight, and smart framing gives scale to distant structures. When astrophotography is done well, dust lanes feel sculpted, color stays honest, and the final frame invites viewers to linger rather than skim past a pretty sky.
The Beauty of Astrophotography: What Makes a Great Astrophoto?
 What separates a keeper is intention you can see: clean signal, accurate star color, and a composition that guides the eye from horizon to deep space. The craft behind how does astrophotography works appears in calibrated flats and darks, precise guiding, and restrained noise control. During finishing, gradients and color balance matter — a subtle sky enhancer in the workflow can lift the Milky Way without crushing shadows. Add a grounded foreground or a sense of motion, and the image reads as a place, not just a pattern.
Your AI-Powered Photo Editor for MacOS and Windows
Discover Now!Most Stunning Astrophotos Ever Captured
Not every night-sky image needs a rare event — the standouts combine solid data with clear storytelling. Think tight stars, honest color, and a composition that gives scale to what’s above the horizon. Below are two classics that show why careful planning and finishing turn familiar targets into lasting photographs.
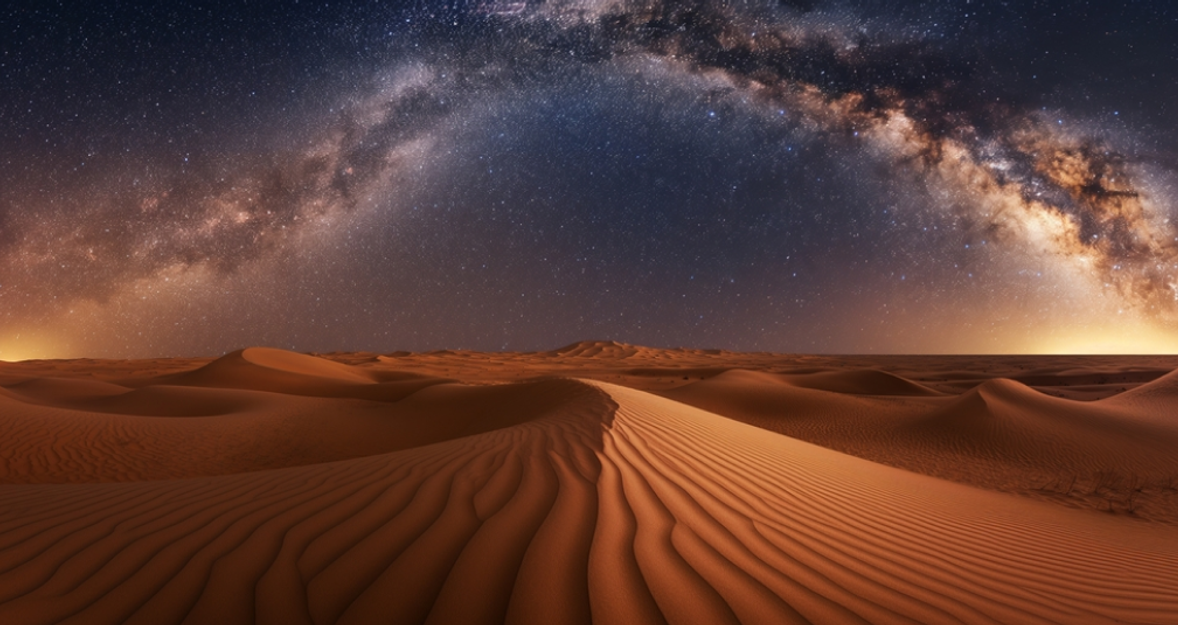
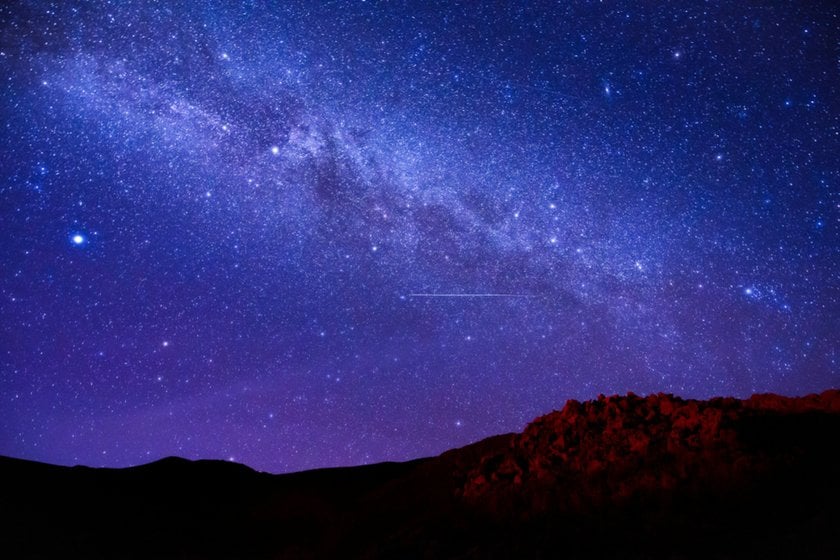
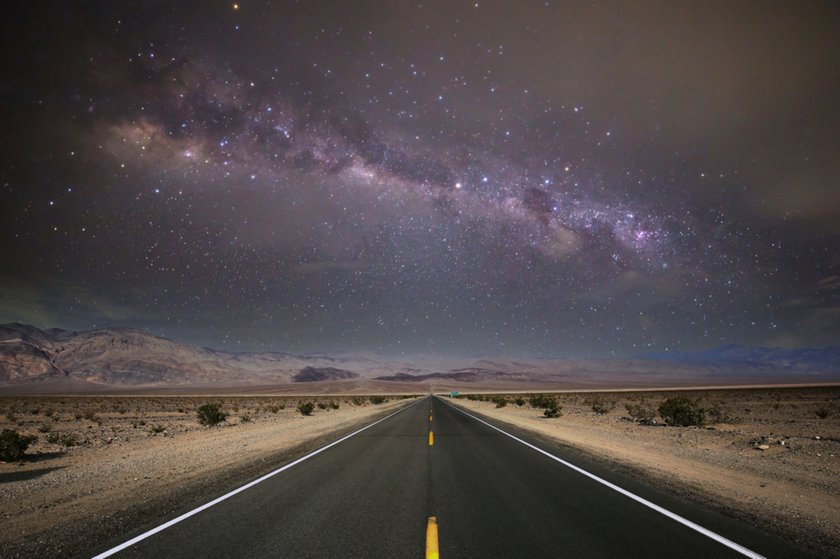
1. The Milky Way Over the Desert
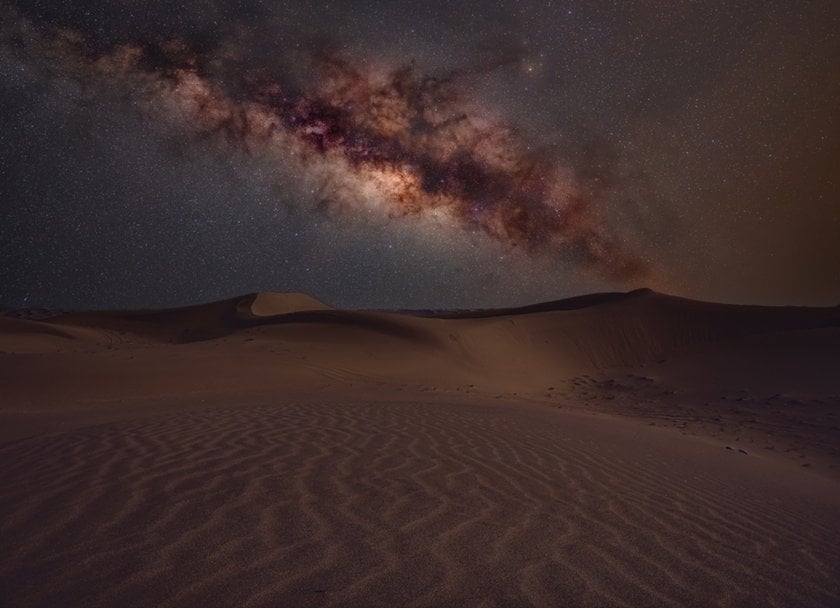 Dry air, vast horizons, and minimal light pollution make deserts perfect stages for the Galactic Core. The strongest images pair a clean arch of stars with simple ground geometry — dunes, cracked clay, or a lone rock — so scale is obvious and clutter stays out of the frame. Photographers often combine a tracked sky with an untracked foreground to keep stars pin-sharp, while sand retains natural texture. A vertical panorama preserves the full sweep from horizon glow to dense dust lanes; subtle color balance holds airglow greens and warm sodium on the skyline without tipping into neon. The result feels both intimate and planetary.
2. The Andromeda Galaxy (M31) in Full Detail
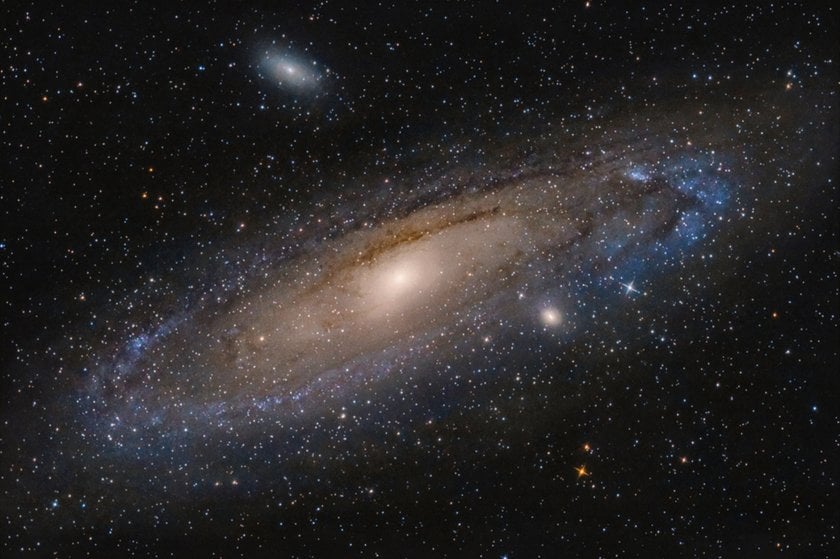 Among deep-sky subjects, M31 rewards patience with visible structure: a bright core, layered dust lanes, blue star-forming knots, and the companions M32 and M110. A short refractor or telephoto lens frames it well; longer focal lengths reveal fine lanes without losing the oval silhouette. Long total integration — hours, not minutes — lowers noise, while careful colour calibration keeps the core neutral and the disk gently blue. Many top frames use restrained star reduction, so the stellar field doesn’t drown the spiral texture. Cropping a touch off-center adds motion to the oval, turning straightforward astronomical work into a portrait with direction.
3. The Orion Nebula (M42) in Glorious Color
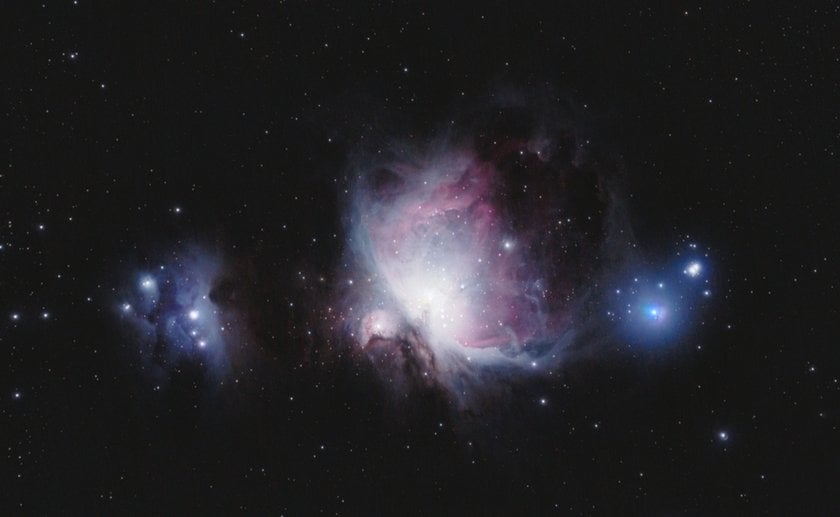 M42 is a dynamic-range stress test: a blazing Trapezium core wrapped in pastel hydrogen, teal oxygen, and rippled dust. Standout frames blend short subs for the core with long integrations for faint outer shells, revealing shock fronts without star bloat. A natural broadband palette keeps hues believable; narrowband adds sculptural separation when handled lightly. As an astrophoto case study, it shows how astrophotography works when exposure planning and restraint meet thoughtful color management.
4. The Pleiades Star Cluster (M45)
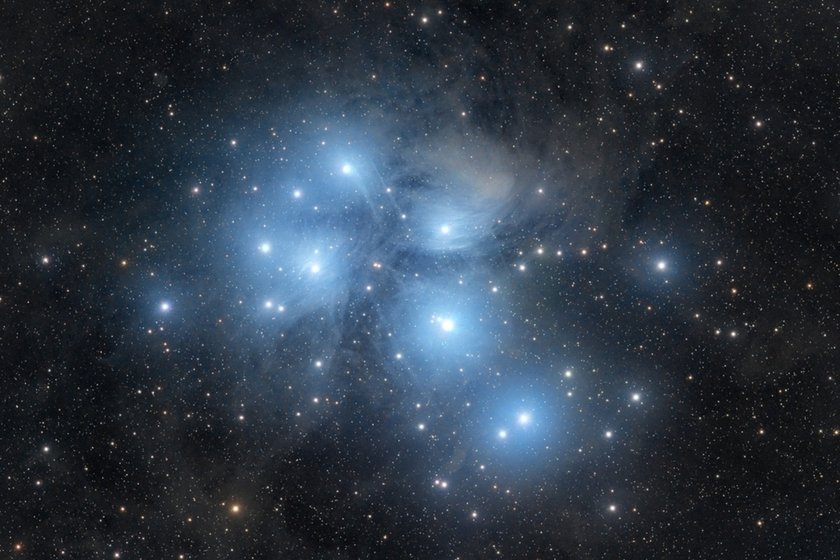 Here, bright blue stars float inside delicate reflection nebulosity and fine brown dust. The best takes control of halos, preserves true stellar color, and treats the dust veil gently so it feathers into the background. Moderate focal lengths keep the full asterism and its airy context intact. In astronomy photography, this target rewards a light touch — think clean gradients, mild star reduction, and minimal sharpening in a practical astrophotography workflow.
5. The Eagle Nebula’s Pillars of Creation (M16)
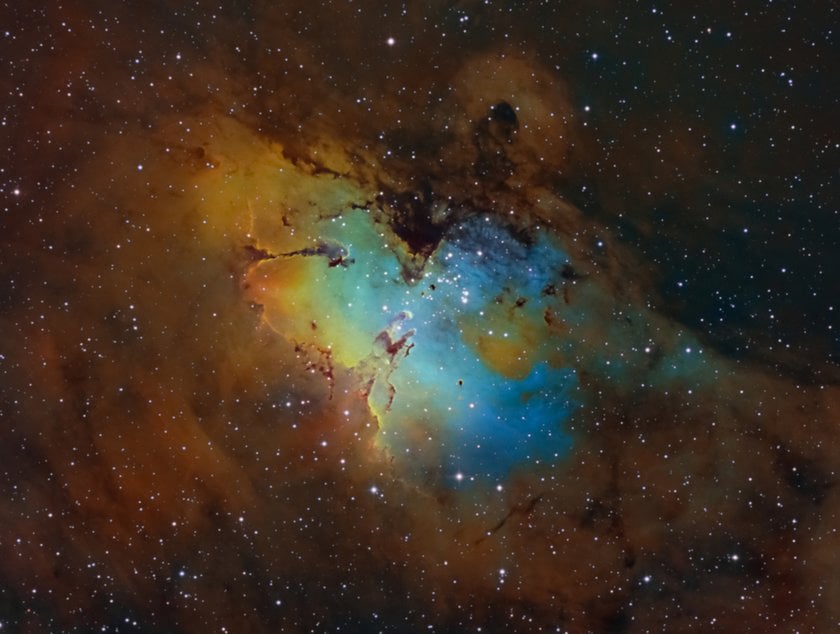 Structure is the story: narrowband separates sulfur, hydrogen, and oxygen to carve depth, while a natural blend retains warm cluster tones and nuanced gas. Micro-contrast belongs on the pillar edges; interiors stay softer so forms feel lit, not etched. A slightly off-center crop leaves room for nearby star-birth regions and adds motion. As astronomical photography, M16 showcases how composition and palette choices elevate data into a coherent deep-sky portrait.
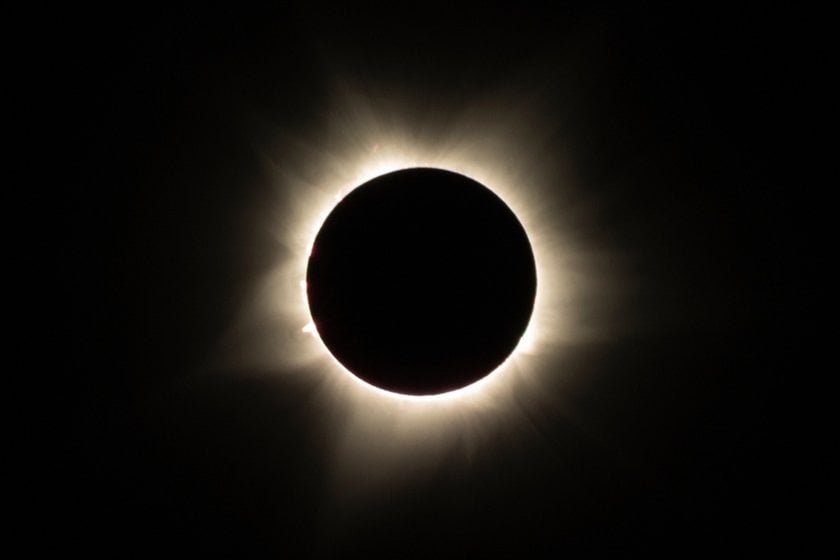
6. A Total Solar Eclipse: Day Turns to Night
 A lace of filaments from a supernova remnant: teal oxygen strands crossing deep red hydrogen near 52 Cygni. Small stars and low noise protect the fine mesh; gentle deconvolution helps, heavy sharpening breaks it. Dual-band or full narrowband separates structures cleanly, with broadband star colour retained for context — concise astronomical photography that values restraint.
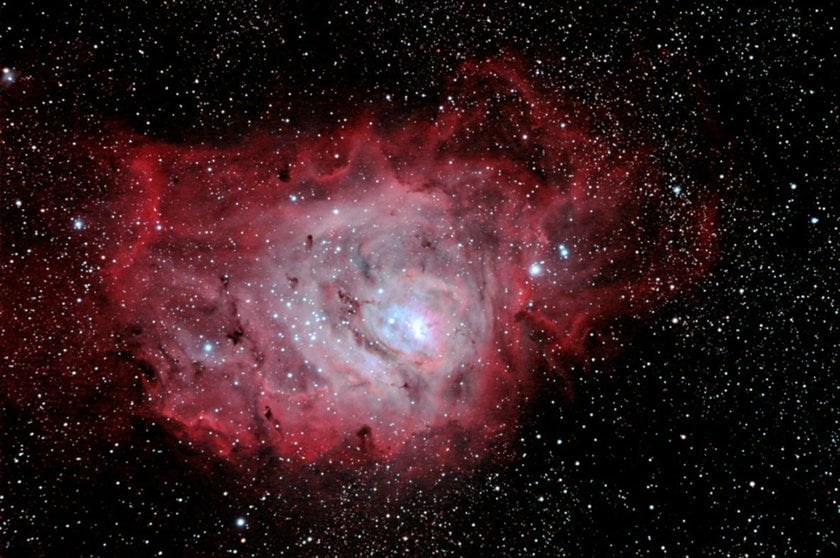
7. The Lagoon Nebula (M8) and its Vivid Hues
 Totality compresses extremes into minutes: chromosphere flash, Baily’s beads, the diamond ring, then the corona’s streamers. Strong eclipse images combine bracketed exposures for outer structure with a short frame for the inner loops and a separate shot for Earthlit lunar detail, so limb geometry stays true. Color is kept neutral — prominences read magenta against a steel-blue corona without neon shifts. Wide views show 360° “sunsets” on the horizon; tight crops emphasize coronal symmetry shaped by magnetic fields. It’s where planning and timing matter more than hardware — a live, high-pressure lesson from any practical astrophotography guide.
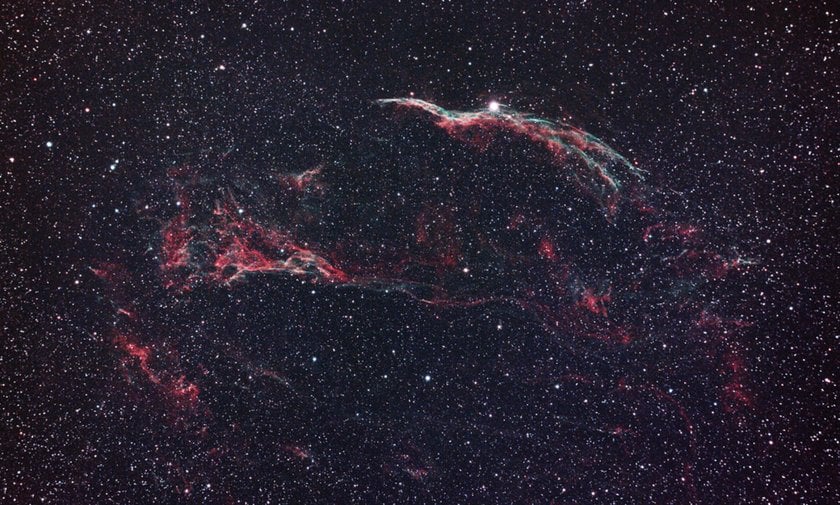
8. The Veil Nebula (NGC 6960) in Stunning Clarity
 M8 showcases active star formation: the Hourglass core, red hydrogen emission, and dust lanes near cluster NGC 6530. The best renditions preserve warm reds and brown reflection dust in broadband, while narrowband (HOO/SHO) isolates shock fronts without crushing texture. Long integration reveals faint dark lanes; restrained star control keeps the Sagittarius field from overpowering the target. Framing adds context — go wide to anchor M8 within nearby star clouds, or crop to make the Hourglass the hero. Careful gradient removal and color calibration prevent a green cast. Bright, accessible, and rewarding, it’s a classic astrophotography subject at moderate focal lengths.
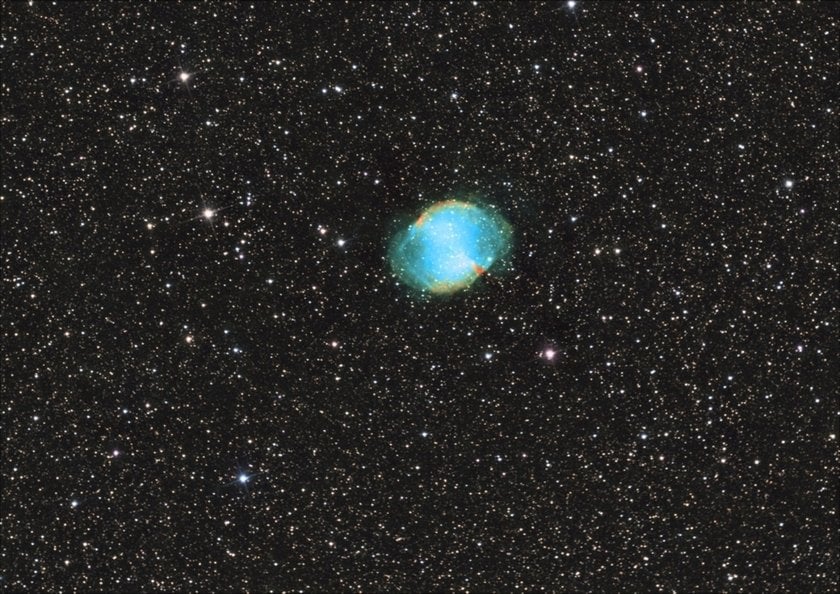
9. The Dumbbell Nebula (M27): A Celestial Gem
 The Western Veil — the “Witch’s Broom” beside 52 Cygni — is a lattice of shock-front filaments: teal [O III] threads crossing deep red H-alpha. Keep stars small and noise low so the lacework stays intact; gentle deconvolution helps, heavy sharpening fractures fine strands. Dual-band or full narrowband separates emissions cleanly, then a broadband star-color layer restores natural hues for context. A diagonal sweep through the frame adds motion and leaves room for faint wisps that hint at the larger arc. It’s precision astronomy photography — disciplined adjustments, strong signal, and a palette that favors structure over flash.
10. The Trifid Nebula (M20) and its Dual Colors
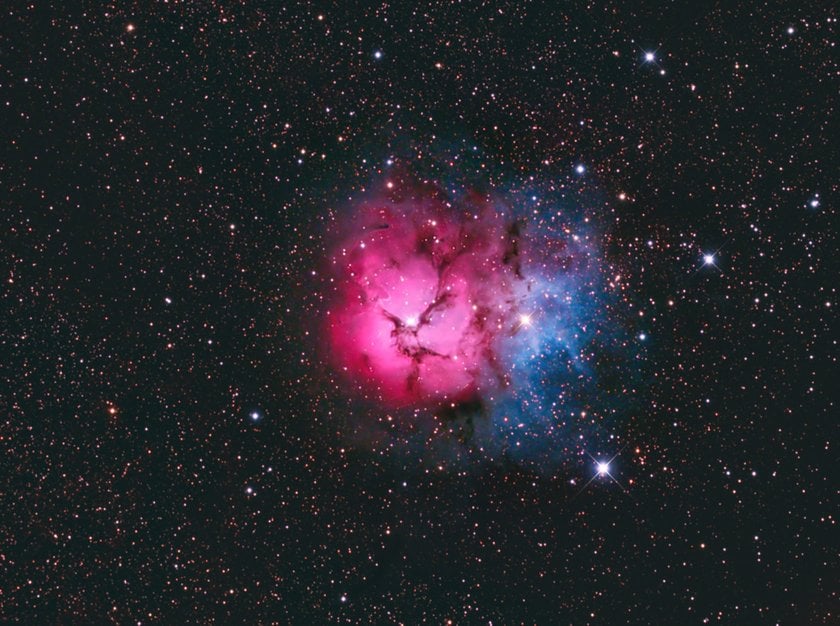 M20 combines three elements in one frame: a red emission region, a blue reflection cloud, and dark dust lanes that split the core into “trifid” lobes. Broadband data preserves the natural red-blue contrast, while longer integration teases out the faint outer envelope and the surrounding star field. Gentle star control helps the dust rifts read cleanly without over-sharpening. As a mid-focal-length astrophoto, it rewards careful color calibration and restrained noise reduction.
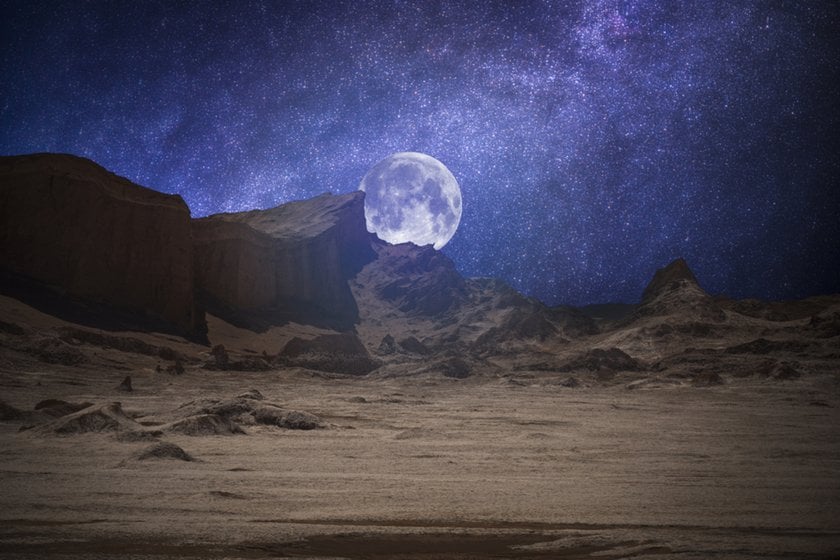
The Best Locations for Capturing Award-Winning Astrophotos
To avoid having to retouch the sky edit later, it is essential to find the right location. Now, we will explore some places that offer breathtaking views of the sky. Thanks to this, almost every photo will be unbeatable.
1. Mauna Kea, Hawaii: Unmatched Clarity Above the Clouds
 At ~13,800 ft, Mauna Kea rises above marine haze and many weather layers, delivering dry, stable air and extremely low light pollution. The result is pinpoint stars, superb transparency, and reliable seeing — ideal for Milky Way arcs and telephoto targets alike. Permits, altitude acclimation, and respect for cultural and environmental guidelines are essential for a successful astrophotography session.
2. Atacama Desert, Chile: A Stargazer’s Paradise
 One of the driest places on Earth, the Atacama offers dark Bortle 1-2 skies, high elevation plateaus, and minimal cloud cover year-round. Airglow is distinct, the Galactic Center rides high in winter, and long integrations run clean thanks to low humidity. From wide-field panoramas to deep-sky work, it’s a benchmark destination in modern astronomy photography.
3. La Palma, Canary Islands: Pristine Dark Skies
 Trade winds and an inversion layer keep clouds low while observatories crown the ridge at Roque de los Muchachos, yielding steady, transparent nights. The island’s sky-protection law limits light pollution, so the Milky Way pops even near villages, and Bortle 2 conditions are common along high roads. Volcanic calderas, pine forests, and sea-of-clouds views give easy foregrounds without stray glow.
4. Jasper National Park, Canada: The Aurora’s Playground
 A designated Dark Sky Preserve with towering peaks and reflective lakes, Jasper serves up strong compositions year-round. Autumn and winter bring crisp air and frequent aurora; summer favors Milky Way arcs over still water. Access is straightforward along Highway 93, and short hikes reach quiet shores where you can wait out solar activity. For astrophotography, plan multiple frames: one for the sky, another for shadowed terrain, then blend with a light touch.
5. Death Valley, USA: Night Sky Wonders in the Desert
 America’s hottest, lowest park doubles as a night haven: bone-dry air, huge horizons, and vast Bortle 2 basins. The salt polygons at Badwater, rippled dunes at Mesquite Flat, and Zabriskie’s badlands offer clean geometry that won’t fight the star field. The best seasons are fall to spring, when cooler nights and steadier air prevail; wind can erase footprints and refresh the foreground in a day. Bring extra water and watch mirage-induced shimmer at twilight for a cleaner astrophoto once full darkness lands.
Techniques Used to Capture These Stunning Astrophotos
Great results start with solid data and careful restraint. For galaxies and nebulae — classic deep sky photography — use equatorial tracking, autoguiding, and dithering, then stack calibrated lights, darks, flats, and bias frames. Narrowband filters isolate emission in bright cities; broadband preserves natural star color at dark sites. In post, keep a linear workflow: neutralize gradients, calibrate color, apply gentle star reduction, and use mild deconvolution and noise control to reveal structure without halos or brittle edges.
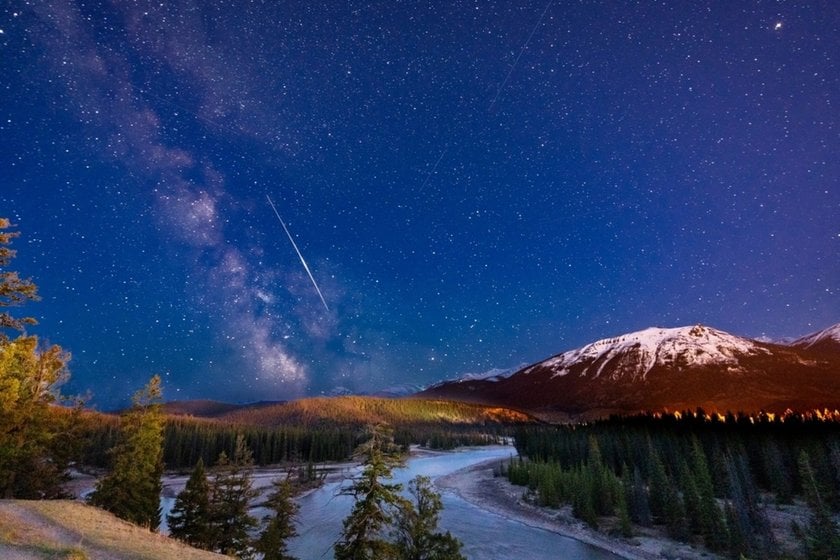
Long Exposure Photography for Capturing Star Trails
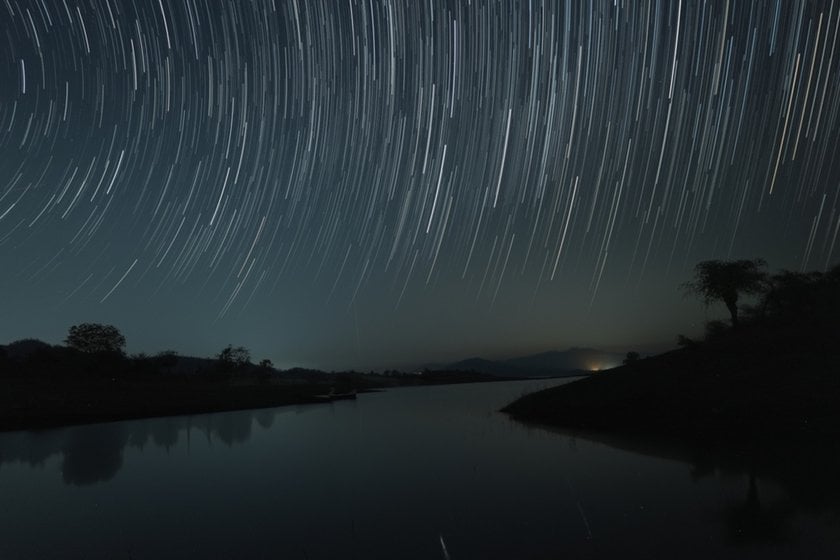 Star trails depend on time rather than tracking. Compose around Polaris or a strong foreground, then either shoot one long exposure or stack many 20-30-second frames via an intervalometer. Lock manual focus, keep ISO moderate to curb noise, and blend a separate blue-hour foreground for clean detail without blowing out the sky.
Perfecting the Focus for Sharp Star Details
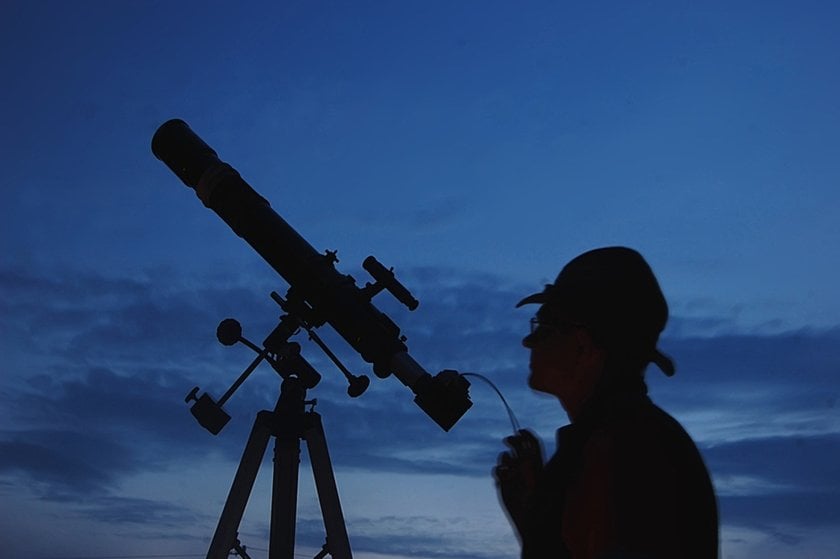 Lock focus before you chase exposure: switch to manual, magnify a bright star 10×, and rack the ring until the point turns smallest with symmetrical diffraction. Re-check after any temperature shift or tripod bump, and use taped marks for repeatability. On capture, keep stars mid-frame when focusing to minimize field curvature; during review, inspect at 100% in several corners. If a frame is close but not perfect, reserve micro-correction for later — a light pass with a sharpen tool on the stellar cores only — and avoid global sharpening that blooms halos.
Using Light Pollution Filters to Enhance Star Colors
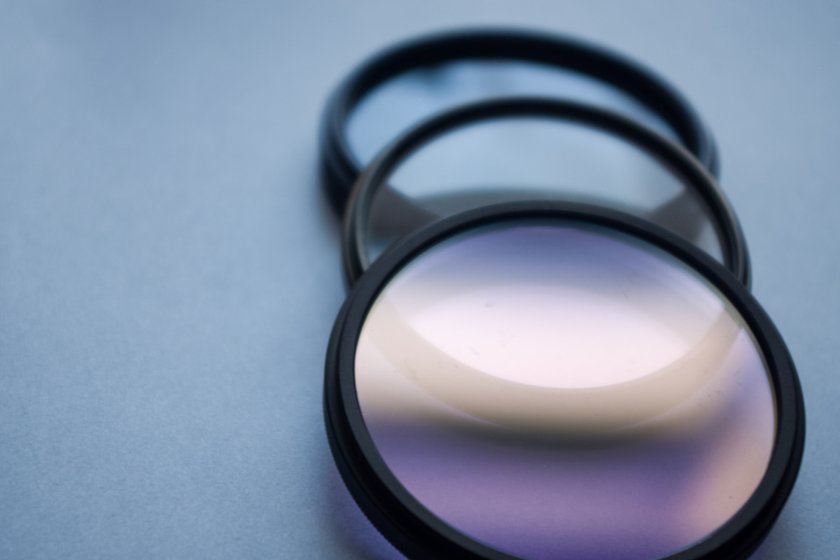 Broadband skyglow washes star hues into gray. Dual-band and multi-band light-pollution filters trim that glow so stellar color and emission lines separate cleanly. Under suburban skies, a modern “city” filter can preserve natural white balance while protecting H-alpha and OIII, making blue-yellow star pairs pop and nebulae read without heavy saturation pushes. For deep sky photography, match the filter to your sensor (OSC vs. mono) and target type; then expose longer to reclaim signal. Calibrate with flats and a neutral background model to ensure the palette remains believable, rather than appearing teal-shifted.
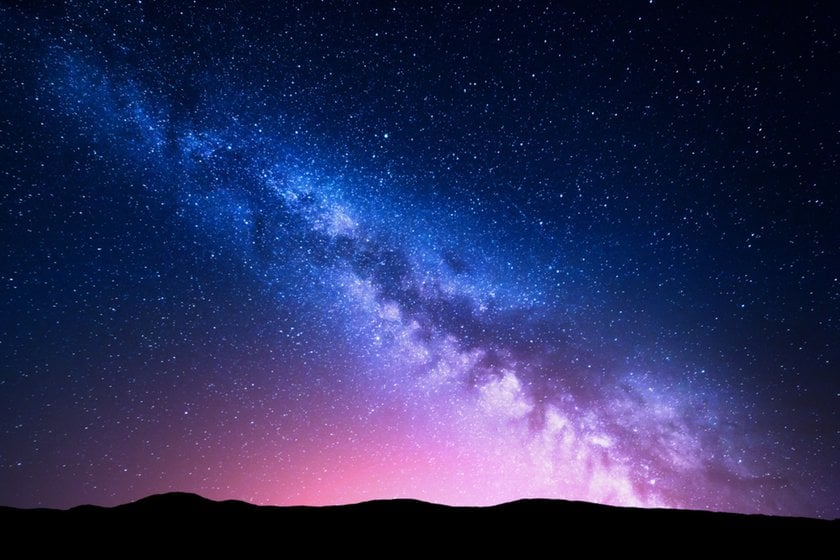
Creative Composition: Framing the Night Sky with Landmarks
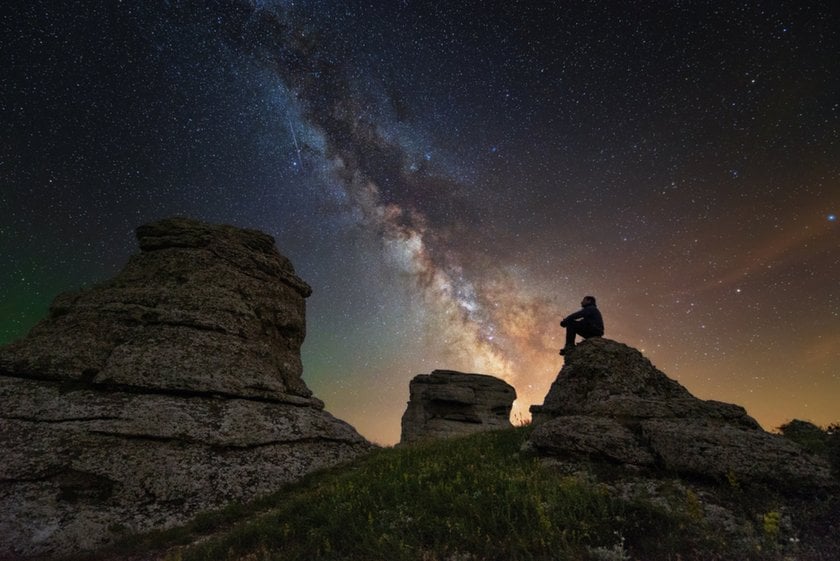 Great frames anchor the cosmos to a place. Use ridgelines, arches, lighthouses, or lone trees as scale cues, then align them with the Milky Way core, a rising constellation, or the arc of star trails. Low angles turn foregrounds into silhouettes; side light reveals texture without stealing attention. Pre-plan with apps for azimuth and altitude, arrive early to scout safe footing, and build a two-exposure blend — tracked sky, static ground — for crisp stars and honest terrain. Thoughtful placement turns astrophotography from a pattern of points into a scene with a story.
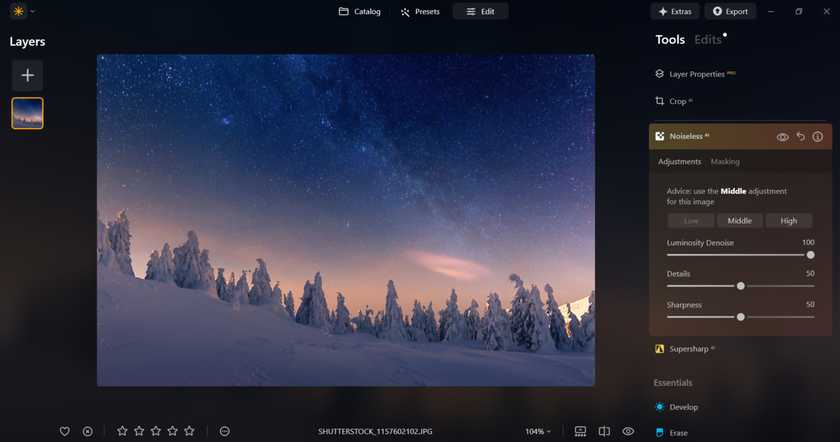
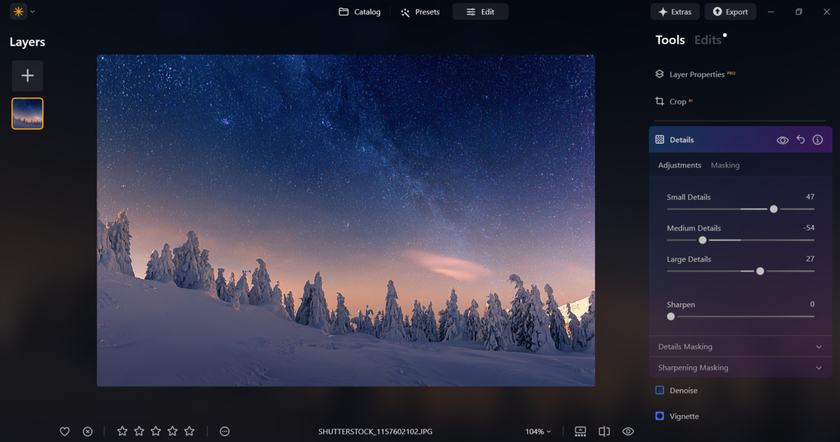
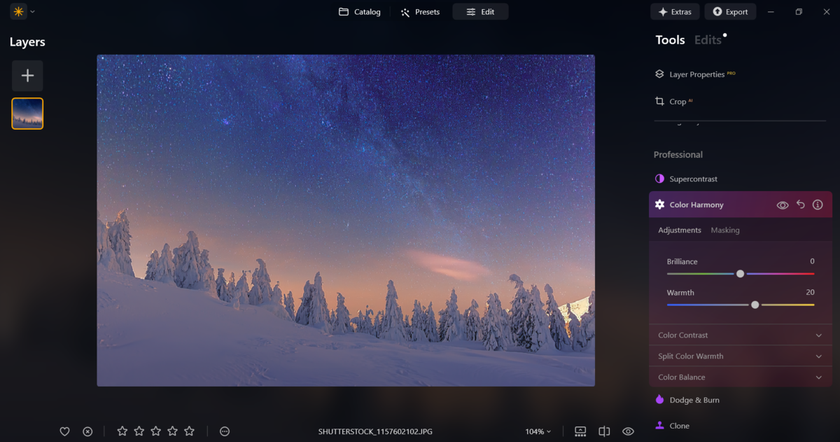
Post-Processing: Enhancing Astrophotos to Perfection
In Luminar Neo, think “clean signal first, style second” — a simple path that suits astrophotography for beginners and seasoned imagers alike.
1. Start with Noiseless AI on the background while masking out brighter stars and nebula cores; follow with Supersharp AI or a mild Details adjustment to lift fine structure without hard edges.

2. For color, set a neutral baseline in Develop RAW (white balance, blacks, and curves), then use Color Harmony or HSL to separate red H-alpha from teal OIII, keeping star color believable.

3. If gradients creep in, combine Relight AI with linear Masks to even the sky without flattening contrast. 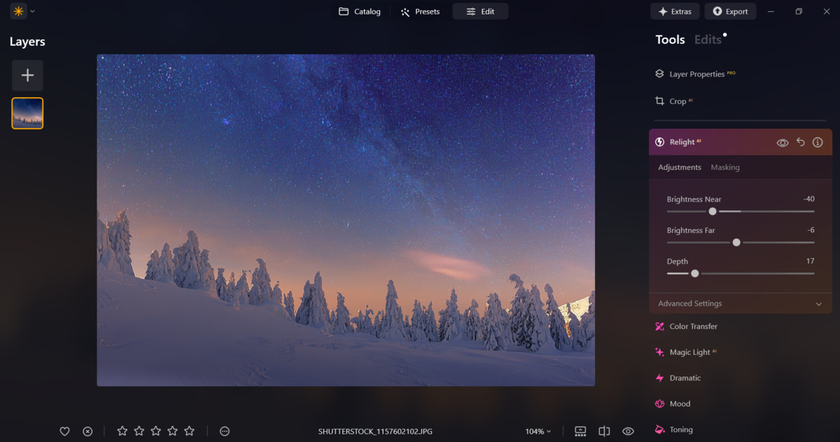
4. Stacking remains essential for the cleanest data — align and integrate frames in a dedicated stacker (e.g., DSS/Sequator/Siril), then bring the master into Neo for finishing; for wide scenes with exposure brackets, HDR Merge helps recover foreground detail while you keep the sky linear. 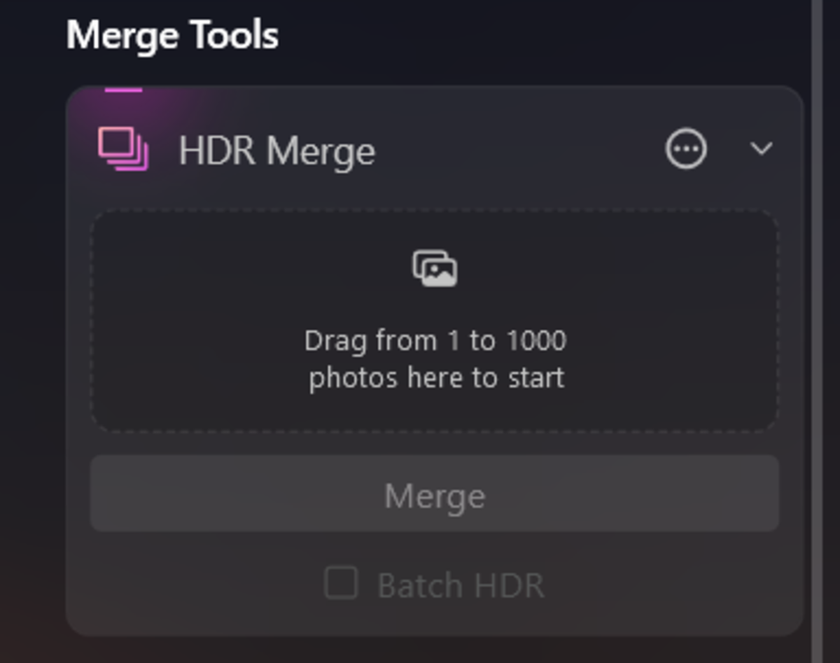
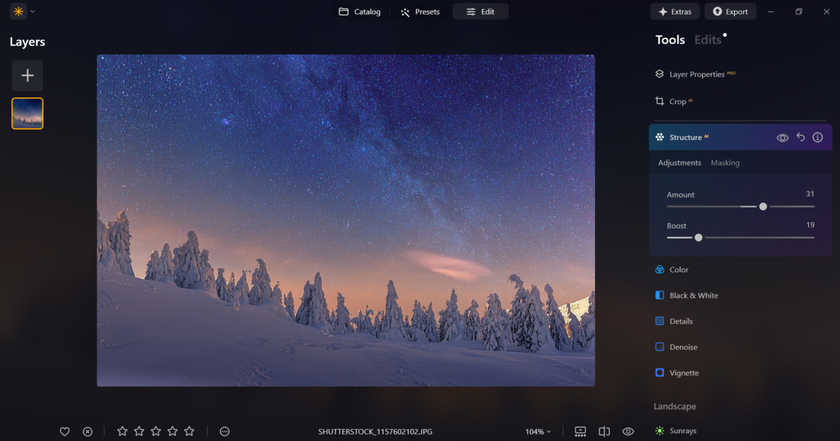
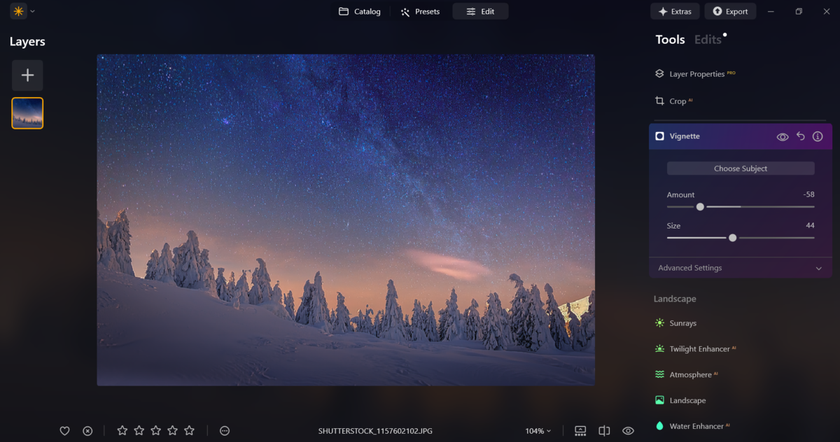
5. Finish with tiny star reduction via a masked Structure/Details tweak and a gentle vignette that frames, not hides, the field.
Final Thoughts
Astrophotos stand out when craft and restraint meet intent: clean data, accurate color, and a composition that reads instantly. Plan for darkness, weather, and moonlight, collect more signal than you think you need, and process just enough to reveal structure without breaking it. Do that consistently, and even familiar targets feel fresh, coherent, and believable.
FAQ
How do I reduce noise in my astrophotography images?
Stack many calibrated subs (lights/darks/flats/bias), dither between frames, and keep sensor temperature stable. In processing, apply mild denoising on the background while protecting stars and fine filaments.
How can I enhance the colors in my astrophotos?
Balance gradients first, then calibrate star color; use gentle curves and selective saturation. For emission nebulae, dual-band or narrowband data separates H-alpha and OIII without skewing the palette.
What settings should I use for night sky photography?
Start wide open at f/1.8-2.8, expose ~10-20 s (use the NPF or 500 rule as a guide), and set ISO 1600-6400. Nail manual focus on a bright star and shoot RAW.
How do I choose the right location for astrophotography?
Prioritize dark Bortle zones, clear forecasts, low humidity, and stable seeing; check altitude and local light ordinances, and plan around the Moon’s phase and rise/set times.
What are the best cameras for capturing high-quality astrophotos?
Full-frame mirrorless bodies with low read noise and good high-ISO performance are reliable; for deep-sky, cooled astronomy cameras (mono or OSC) offer the cleanest data. Astro-modified sensors help with H-alpha targets.